
 Materials/supplies needed:
- A small amount of yellow (chick) or blue (baby bird) yarn, double-knitting weight
- A very small amount of black yarn, same weight as above
- A small amount of polyester stuffing
- 2.50 mm crochet hook
- Tapestry needle
- 1 pipe cleaner, orange (chick) or yellow (baby bird)
Abbreviations used:
mr: make a ring
sc: single crochet
st: stitch
inc: increase
invdec: invisible decrease
If there is anything you don't understand in this pattern, please comment below and I'll respond to you personally.
Making the body:
Make a ring, and work 6 sc into the ring. (6 st)
Rnd 1: 2 sc in each st around. (12)
Rnd 2: (2 sc in next st, 1 sc in next st) 6 times. (18)
Rnds 3-6: inc 3 times evenly. (30 st at the end of rnd 6)
Rnds 7-8: work even. (30)
Rnds 9-12: invdec 3 times evenly. (18 st at the end of rnd 12)
Rnd 13: (invdec over next 2 st, sc in next st) 6 times. (12)
At this point, cut the yarn about 20 cm from your work, and pull the loop on your crochet hook bigger and bigger until the tail of the yarn comes through and you're left with a single strand coming out of your work.
Cut a 2" length of pipe cleaner and fold it in half; this will be your beak. Insert the two ends between rounds 7 and 8, two posts apart. Push the beak in until it's of the desired size, then twist the ends together inside so they're secure. Cut off any excess pipe cleaner.
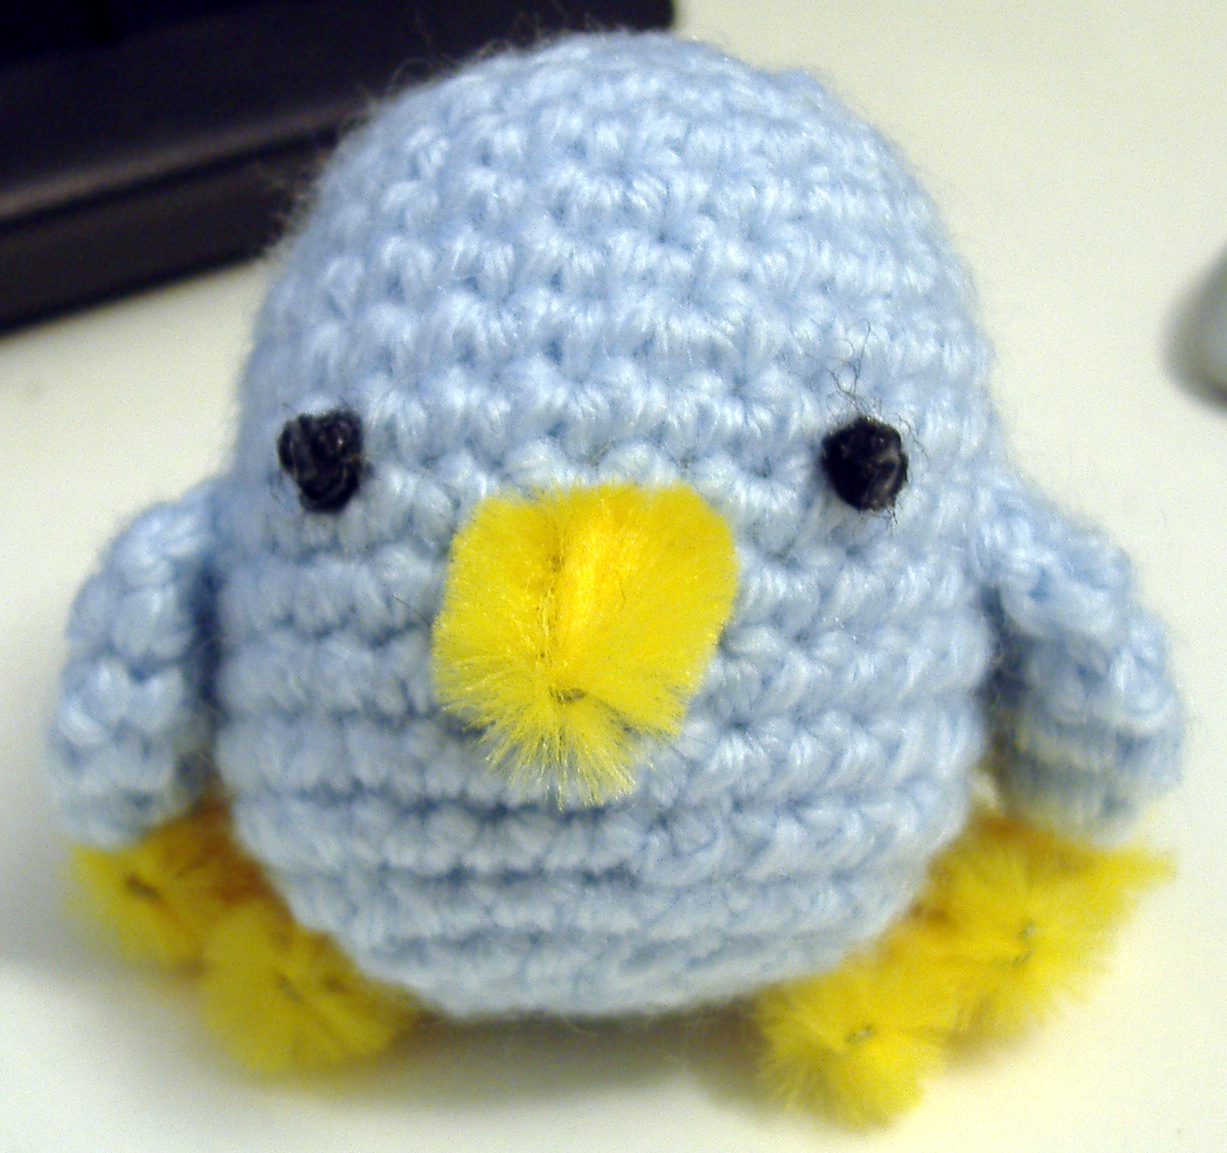
With the tapestry needle and the black yarn, embroider a French knot for each eye, using the photo as a guide to placement. Don't forget to use a dab of craft glue on each French knot to hold it together, or it is likely to unravel.
Making and inserting the feet:
This part of the pattern is the most difficult to describe, so I've drawn a diagram:
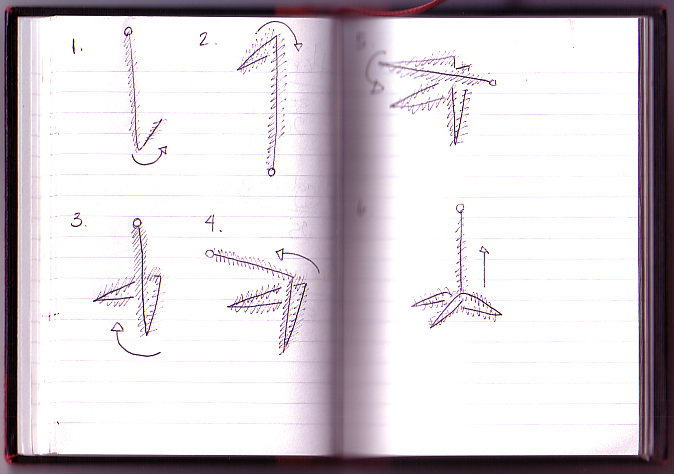 The long and short of it is: use the remaining pipe cleaner to fashion two three-toed birds' feet, with the leg sticking upright.
The legs should be placed between rounds 11 and 12, 9 posts apart. To fix them in place, push the leg through the fabric, then twist it into a loop, which then lies flat against the fabric on the inside. I like to think of this configuration kind of like how you would imagine a snake coiled up in the bottom of a basket. Anyway, this whole exercise is to ensure that the leg can't simply be pulled out, so any way you can accomplish that is sufficient.
Finishing the body:
Now that you've finished the eyes, beak and feet, you can stuff your bird with a bit of polyester stuffing, and close the hole. I like to under-stuff these birds because they make quite good stress toys and they're fun to squeeze!
Close the hole by threading the end of your yarn onto a tapestry needle and inserting it through the front loop only of each st around. Pull the yarn tight, and the hole will close naturally. Then weave in the ends.
Making the wings (optional):
It's up to you whether you choose to put wings on your bird; some people insist they're just as cute without. If you would like to add wings, as in the picture, here's how you do it:
Make a ring, and work 6 sc into the ring. (6 st)
Rnd 1: 2 sc in each st around. (12)
Rnd 2: work even. (12)
Rnd 3: sc in the first 6 st, ch 1. Now, pinch the fabric together and for the next 6 st, stitch through both layers of the fabric. You will have stitched the wing closed, into a half-circle shape.
Fasten off, leaving a 20 cm tail. Repeat for the second wing.
To finish the bird, whipstitch the wings to its sides, using the photo as a guide.
And finally:
This bird is intended to be enjoyed by adults and older children only. Because there may be sharp ends on the pipe cleaners, I would avoid giving it to a child under three. (Also, if your kids are anything like mine is, they'll be quite good at pulling its little eyes out.)
noisypitta.etsy.com
1 comment:
Hello I am New to this and i do not understand this: Abbreviations used:
mr: make a ring
sc: single crochet
st: stitch
inc: increase
invdec: invisible decrease
Please Help
Thank you
Post a Comment